
Learn how to quickly add subtitles to your videos following two different methods. Maybe you are creating a tutorial and want your audience to be able to follow along easily. Or perhaps you want to expand your audience by creating subtitles in multiple languages.
With VideoStudio, you can easily create customized subtitles manually using the Title Tab for a short video, or with the powerful Subtitle Editor for longer videos. You’ll learn how to import and export your newly created .srt files to use your subtitles on various platforms.
Thanks for watching! We hope you found this tutorial helpful and we would love to hear your feedback in the Comments section at the bottom of the page. You will find a written version of this tutorial below, and a printable PDF copy to download on the Download Resources tab above.
Download a FREE 30-day trial and turn your best moments and life experiences into unique movies with this easy and fun video editor packed with intuitive tools and creative effects.
Download these free resources:
Written Tutorial (PDF, 680 KB)
VideoStudio User Guides and Help files
For VideoStudio X9 to 2023, languages include English, Deutsch, Français, Italiano, Nederlands, 简体中文, 繁體中文, 日本語
What’s New in VideoStudio
Working with Text and Titles
Featured products
 VideoStudio Pro 2023
 Studio Backlot Membership
 VideoStudio Ultimate 2023
 Vision FX
How to Add Subtitles in VideoStudio
Adding subtitles to your video is a great way to make your video easier to follow and can be useful when wanting to create subtitles in multiple languages.
Click on any of the images below to view full-size.
There are two ways to create subtitles using VideoStudio:
- Create subtitles manually using the Title Tab
- Create subtitles automatically using the Subtitle Editor
Creating Subtitles Manually
1. Add the video you want to subtitle to your timeline.
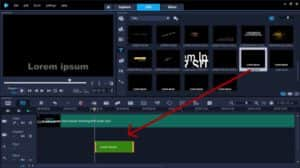
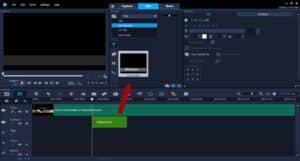
2. Click on the Title Tab and select a title style.

3. Drag the title style onto the title track of your timeline, then drag and position it to your desired location on the timeline.
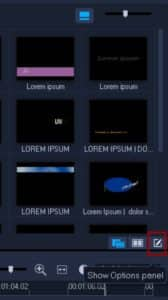
4. Click on the Show Options Panel or double click on the text on the timeline to bring up the title editor.
5. Customize your subtitles by changing the font type, size and color or add a colored text backdrop or shadow.
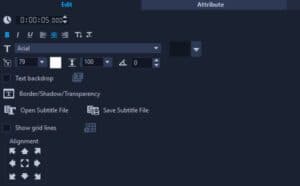
Select where you’d like to place the subtitles by clicking one of the alignment icons, or drag the text on the preview pane to your desired placement.
To use the same subtitle properties in other areas of your video, you may do the following:
- Right-click on the title on your timeline and select
- Click Paste into the Library Panel.
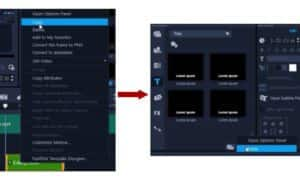
Or from the Gallery dropdown, select My Favorites and drag the title in here.
Now you can drag and drop the saved template onto the title track of your timeline to use in other areas of your video.
Creating Subtitles Using the Subtitle Editor
1. Add the video you want to subtitle to your timeline.
2. Click on the Subtitle Editor

3. Under the Voice Detection section, select the quality of the voice within your clip.
- Best for near-perfect audio quality or Fair or Good if there is other background noise in the video.
- Change the sensitivity level to help the scanner detect the voice.
4. Click Scan.
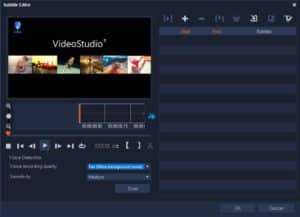
5. Click Play on the preview pane on the left.
- The orange boxes reflect where there is voice present in the clip and also where the subtitles will be placed.
- Make adjustments to the length of the subtitles by dragging the edge of the orange box on the preview pane.
6. To begin subtitling, click on the Play button or click Shift + Space to play the selected subtitle segment.

7. Click on Add a New Subtitle and type in your subtitle for that segment.
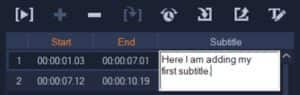
8. Continue doing this for all your segments.
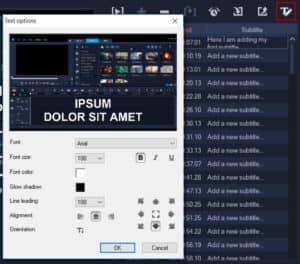
9. Click on the Text Options icon and change the font size, color and other options for all of your subtitles.
10. Click OK, then OK again to add your subtitles to the timeline.
Exporting and Importing Subtitles
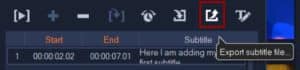
1. Click on Export Subtitle File, and name and save your file.
- To make edits to your .srt file, open your exported .srt file in Notepad.
- Edit the subtitles accordingly or you may translate these into another language.
- Save your file as another .srt file.
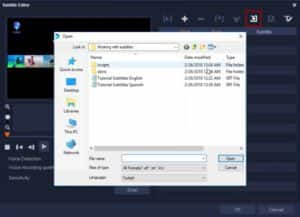
2. In VideoStudio, select Import Subtitle File to import your newly translated .srt file.
3. Click OK to add the subtitles to your timeline.
- You’ll see that they have now all been added to Title Track 2.
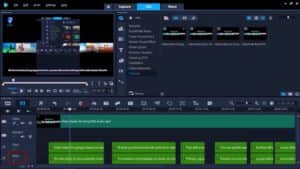
- You can either delete the titles in track one or hide the track by clicking the Disable Title Track
4. Press Play to preview the subtitles on your video.
- To make adjustments, drag the text on the timeline or double-click on the textbox to make any edits in the Options Panel.
5. Export your newly subtitled video!
Download a FREE 30-day trial and turn your best moments and life experiences into unique movies with this easy and fun video editor packed with intuitive tools and creative effects.

Reader Interactions